DIAGNOSTIC WORKUP
Kidney Biopsy
From Needle to Report
The Basics
From Needle to Report
The Basics
Acknowledgment: Based on GlomCon’s Glomerular Disease Virtual Fellowship seminar by faculty speakers Dr. Benjamin Popp, Dr. Geetika Singh, Dr. Mahesha Vankalakunti, and Mr. John Brealey.


Dr. Rachael Kermond
Nephrology Fellow
Royal Children’s Hospital
Australia
Renal Biopsy: Obtaining the core
Indications
Nephrotic syndrome, acute nephritis, rapidly progressive glomerulonephritis, unexplained AKI, non-nephrotic range proteinuria
Contraindications
Absolute: uncontrolled severe HTN, uncontrolled bleeding
Relative: Solitary native kidney, multiple cysts/masses, small hypoechoic kidneys, active renal infection, skin infection, anatomical anomalies
Technique
Percutaneous needle biopsy under ultrasound guidance to obtain two cores (one formalin fixed for LM and one in saline for IF and EM)
- Cores examined under dissecting microscope and divided while fresh
- Core length minimum 10mm and diameter minimum 1.2mm
Complications
Bleeding, infection, damage to surrounding structures, pain, AV fistulas
Renal Biopsy: Processing the core
Macroscopic appearance
Use of dissecting microscopy or standard light microscopy to assist in sample adequacy
Glomeruli can be difficult to visualize due to lack of blood, significant sclerosis, fragmented biopsy with significant blood staining
Adequacy
Diameter
- Aim 14-16 gauge core for individuals >8 years old, given glomeruli 200-250um
Number
- Generally 8-10 glomeruli, prefer > 10. Likelihood of detecting pathology dramatically increased with > 20 glomeruli
- If MCD vs FSGS, 25+ glomeruli including juxtamedullary representation
Region:
- Need to also consider diagnostic regions
- Adequate tubulointerstitial parenchyma to assess interstitial fibrosis & tubular atrophy (IFTA)
- Juxtamedullary in MCD vs FSGS
- Subcapsular in hypertension-associated glomerulopathy
Inadequacy not meant as criticism but aimed to ensure interpret biopsy result with caution
Processing of Sample:
Ensure accompanied by clinical datasheet: allows the pathologist to provide a more accurate final diagnosis rather than interpret the pattern
Formalin pot for light microscopy
- Delegation of tissue must occur within minutes to ensure maximum preservation of architecture
- Generally one whole core
- Core placed in cassette -> formalin fixed -> processed to remove water and replace with alcohol -> infiltrated with wax -> frozen -> sections taken (up to 21 levels)
- Sections 2-3 micron (each section has a dedicated stain, dependent on the laboratory)
Fresh tissue for
- Immunofluorescence
- Snap frozen
- Electron microscopy
- Fixed in glutaraldehyde
- Generally only need a few glomeruli
Basics of light microscopy
Elements evaluated:
Cells: mononuclear, PMN, Eosinophils
Hypercellularity
Glomerular:
-
- Mesangial: IgAN, SLE II, IgM Nephropathy
- Endocapillary: PIGN, MPGN, SLE class III-IV
Interstitial: Tubulointerstitial nephritis
Spaces: Capillary lumen, Bowman’s space
Matrix: Basement membrane, mesangial matrix
Stains:
Haematoxylin and Eosin (H&E Stain) (A) (B) (E)
- Allows the first impression of the composition of tissue
- Hematoxylin stains nuclei blue
- Eosin stains all components of glomerular and capillary wall pink (Podocyte, endothelial cells, immune deposits)
Periodic acid Schiff stain (PAS stain) (D)
- Stain allows the assessment of the basement membrane
- Stains carbohydrates in GBM and mesangial matrix but not other components
- GBM appears more distinct
- Can demonstrate nodularity
Jones Methenamine-Silver Stain (C)
- Stain allows the assessment of the basement membrane
- Stains carbohydrates that can be oxidized to aldehydes, appear black (argyrophilic)
- Primarily stains the GBM and areas of sclerosis
- Can demonstrate spikes, double contours
Masson’s Trichrome Stain (F)
- Stains to assess connective tissue and vessels
- Stains collagen blue, uses three solutions
- Demonstrates subepithelial immune deposits red/pink
- Can show areas of fibrosis and sclerosis in red/pink
Image (with permission): Tyagi et al. Indian Journal of Nephrology 2013
Special stains
- Von Kossa Stain: Detects calcification
- BK virus stain: For SV40
- Sirius red: Demonstrates fibrosis
- Congo red: Visualization of amyloidosis
Basics of Immunofluorescence: Processing of core
Standard IF
Receive native tissue (without fixation) in Michel’s transport media or saline
Freeze followed by cryostat sectioning into 3 microns
Staining with human antibody conjugated with a fluorochrome (Direct immunofluorescence)
- Antibodies labeled with fluorochromes against the following panel
- Immunoglobulins (IgG, IgA, IgM)
- Components of complement pathway (C1q, C3c, C4)
- Kappa and lambda
- Fibrinogen
- Albumin
- Fluorochromes
- FITC (Fluorescein Iso Thiocyanate)
- Phycoerythrin
- Alexa Fluor
Incubate (approximately 1 hour)
Visualize on IF enabled microscopy
Paraffin IF
Advantage of providing a permanent record of fixing but difficult to report due to high background staining of plasma and matrix proteins
Significantly less sensitive for C3 GN, bacterial infection-associated GN, primary membranous nephropathy, anti-GBM nephritis
Unmasking
- Important for suspected light chain proximal tubulopathy and crystalglobulin induced nephropathy
Basics of Immunofluorescence: Interpretation
Need to comment on the following:
Number of glomeruli present
Number of globally sclerosed glomeruli (Often non-specific staining pattern)
Positivity and Intensity of staining: 0-3+ (or 4+)
Staining pattern: Granular, linear, semi-linear, smudgy, garland, coarse, confluent
Location: Peripheral capillary wall, mesangium, capillary lumen, bowman space, tubular basement membranes, vascular wall, nuclear staining
Segmental trapping of C3 and IgM
Internal controls
Basics of Immunofluorescence: Application

IgA nephropathy/HSP (A) Class IV or diffuse lupus nephritis (B) Membranous nephropathy (C)
Post infectious glomerulonephritis (D) C1q nephropathy (E) Diabetic Nephrology (F)
Image: Singh G et al. World J Nephrol. 2016
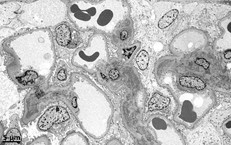
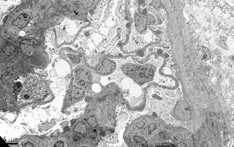
Basics of electron microscopy: Processing
- Identify glomeruli, then cut thin sections of approximately 100nm with a diamond knife, which are subsequently placed on an electrically conductive copper grid
- Utilizes transmission electron microscope: Electrons transmitted through section: darker tissue = more electron dense
Basics of electron microscopy: Application
- Presence and degree of cell proliferation: Mesangial vs endothelial
- Alteration in cell structure (i.e. podocytes)
- Necrosis or apoptosis of cells
- Changes in GBM
- Localization of immunoglobulin deposits (mesangial, subendothelial, subepithelial)
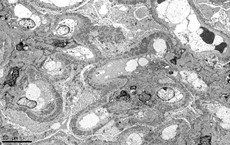
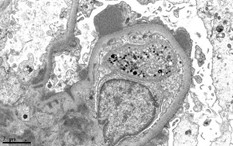
Basics of electron microscopy: Examples
Mesangial electron-dense deposits
Example: IgA nephropathy
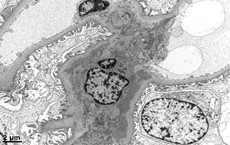
Mesangial electron-dense deposits
Example: Lupus Nephritis Class II
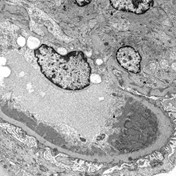
Abundant epimembranous deposits (with spikes)
Example: membranous nephropathy
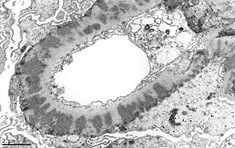
Abundant epimembranous deposits (with spikes)
Example: membranous nephropathy
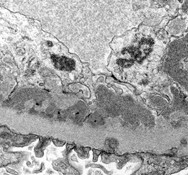
Subepithelial humps
Example: infection-related glomerulonephritis
Subepithelial humps
Example: infection-related glomerulonephritis
Subendothelial deposits with tubuloreticular inclusions (interferon footprints)
Example: lupus class III or IV
Subendothelial deposits with tubuloreticular inclusions (interferon footprints)
Example: lupus class III or IV
Electron microscopy images courtesy of Mr. John Brealey